AppGrid: TimeSeries View
Powerful query, filtering, personalization and presentation features that
delight users, maximize productivity and increase user adoption
Powerful query, filtering, personalization, and presentation features
that delight users, maximize productivity and increase user adoption
AppGrid has been designed to address the limitations of the Salesforce UI and provide an exceptional user experience to help users execute their workflows. AppGrid is ideally suited for mission critical custom line-of-business apps that are not well served by the native Salesforce UI. It is not uncommon for these types of apps to be data intensive where powerful query and filtering capabilities are must have features. AppGrid provides both of these in spades. Let's take a tour of the AppGrid features and provide a detailed understanding of how to use the app.
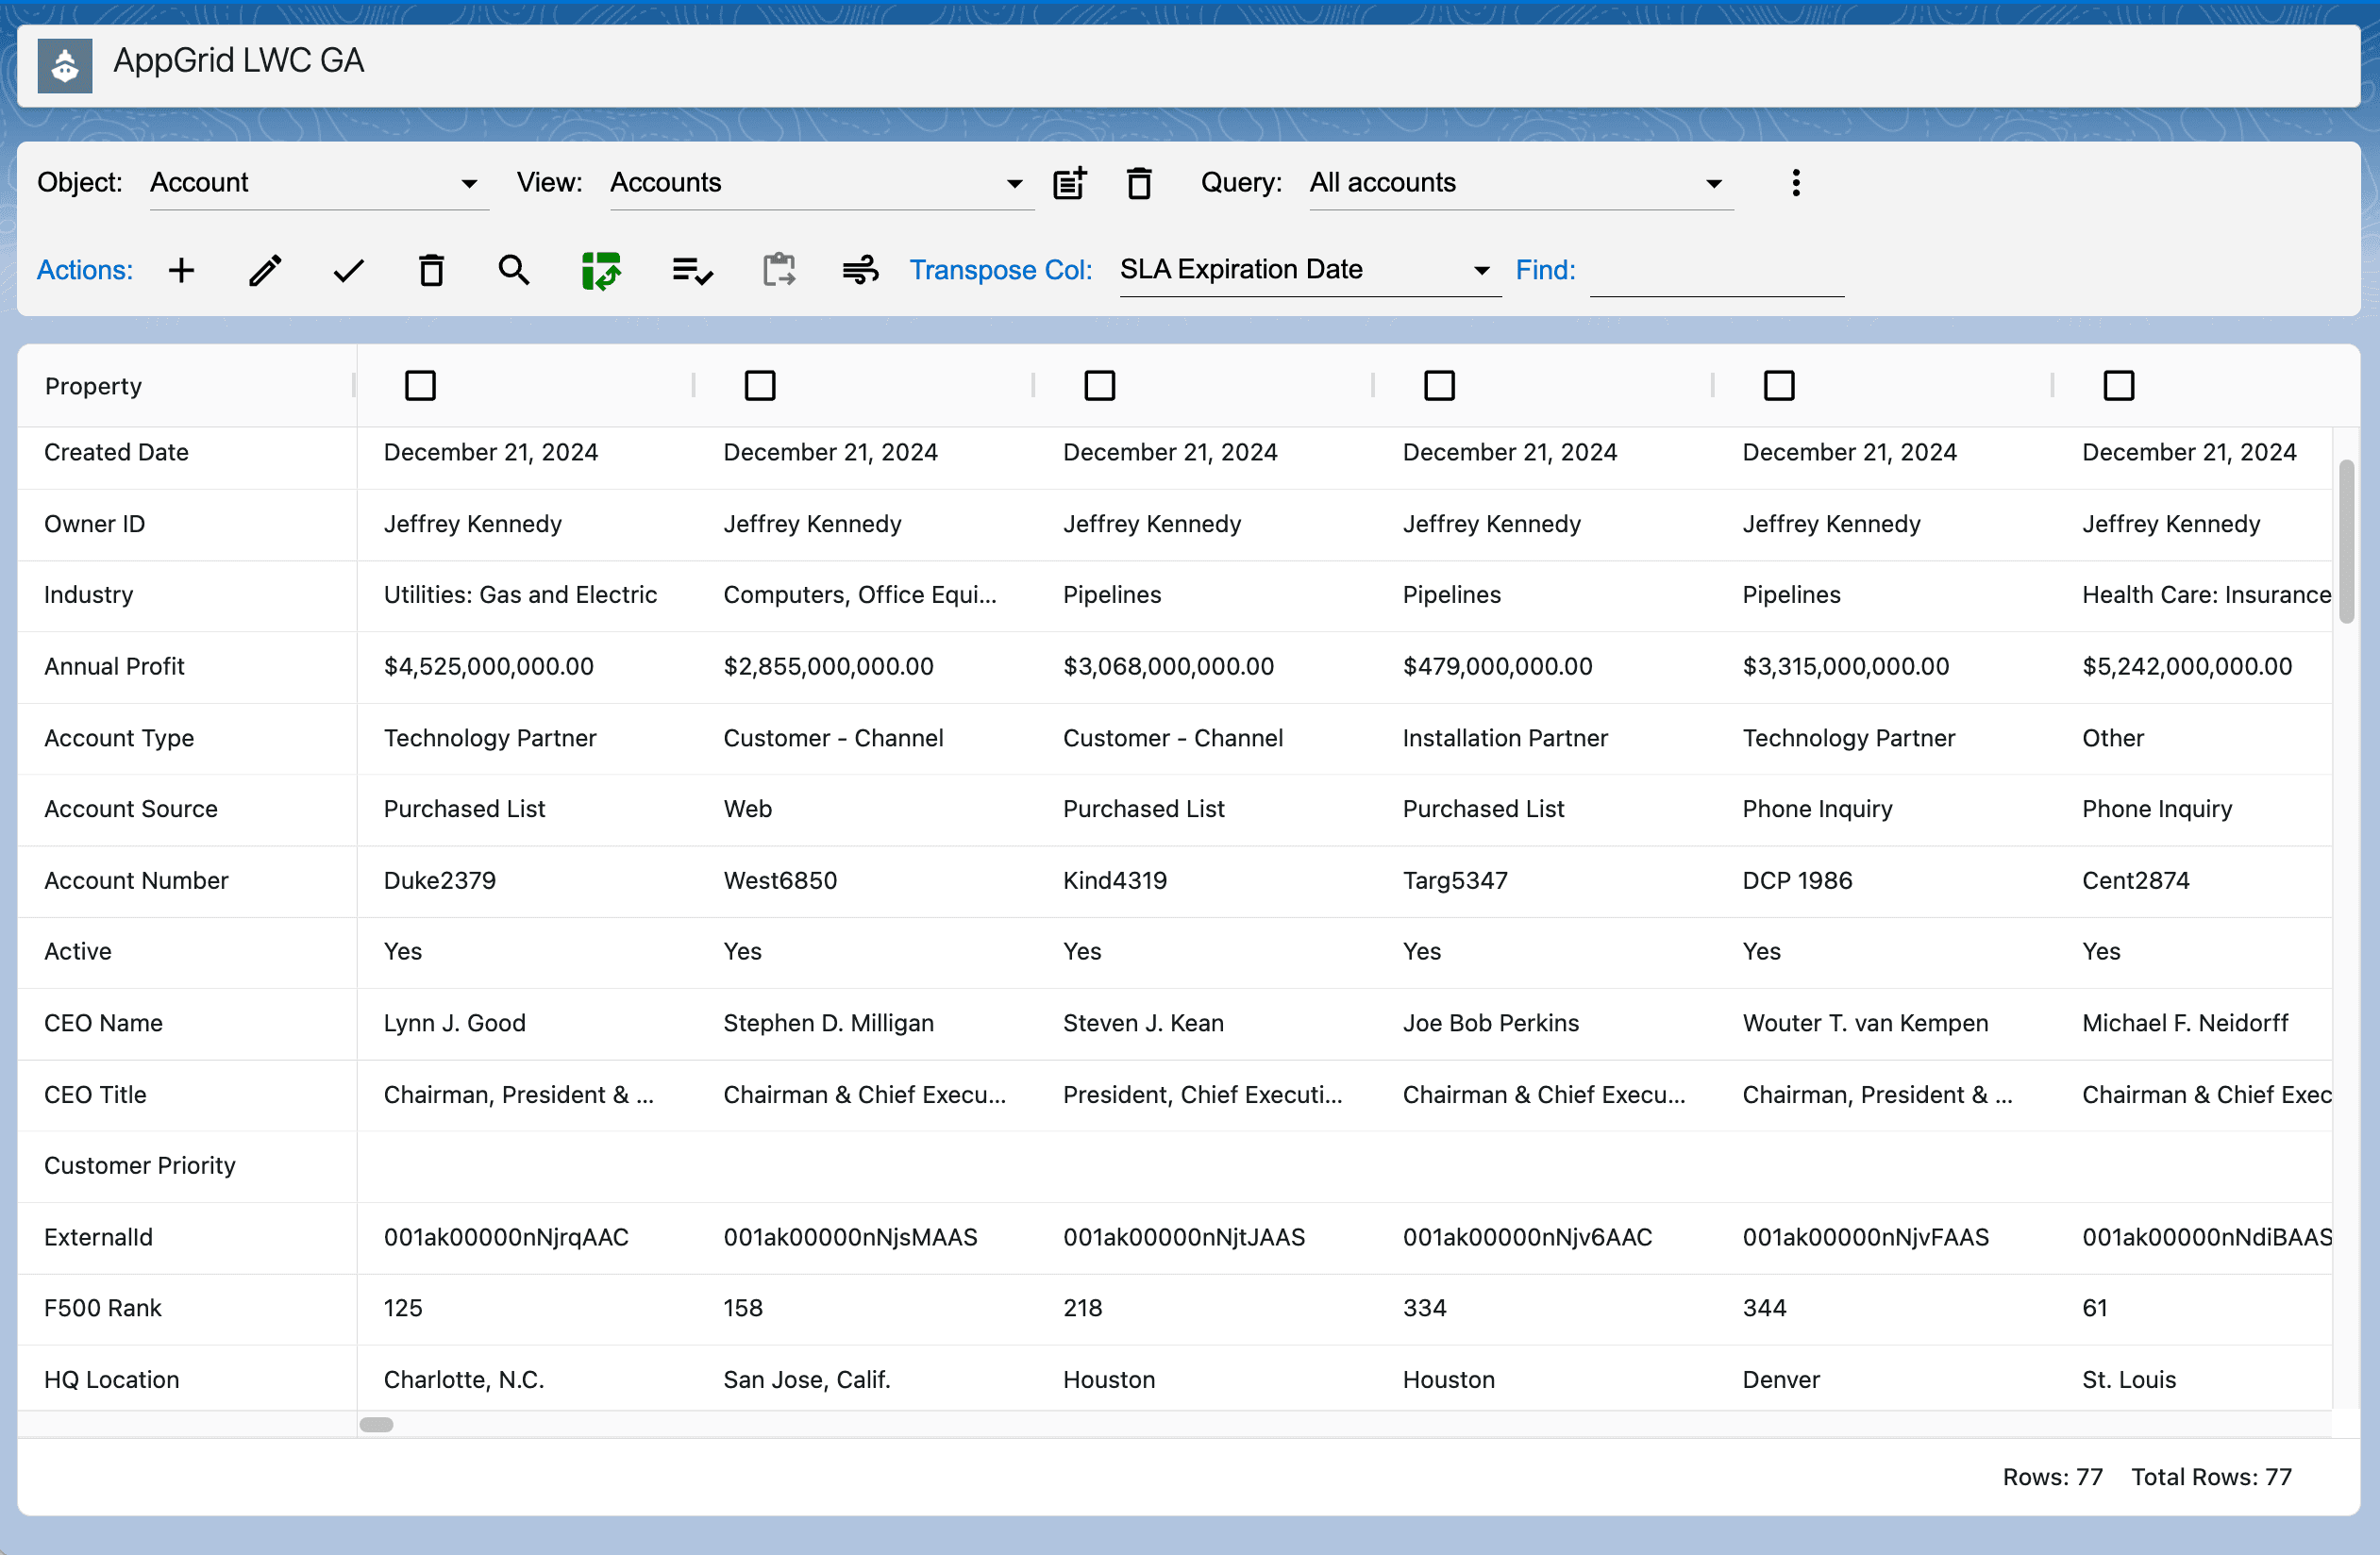
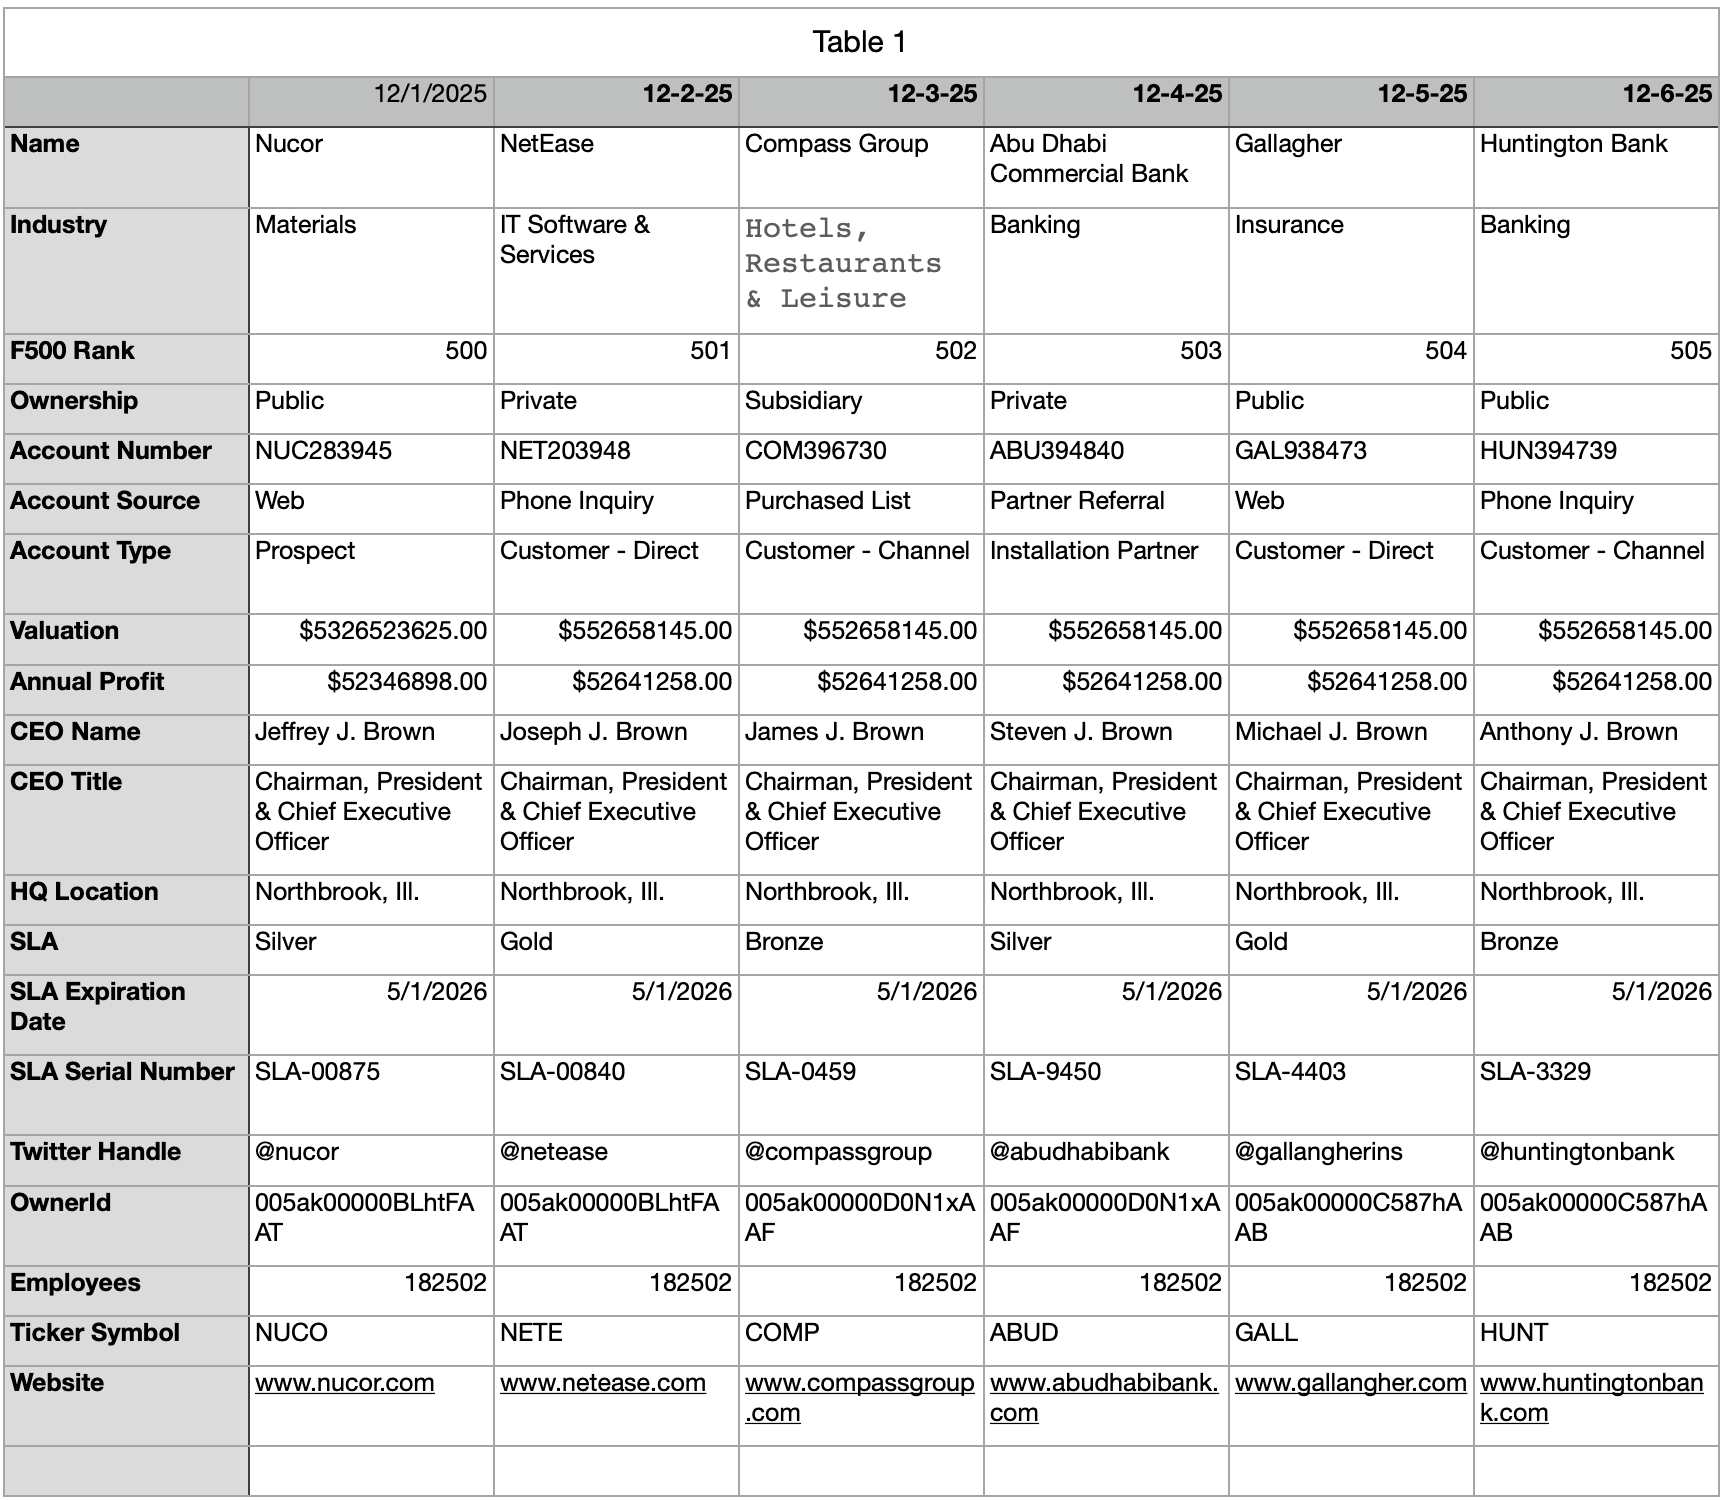
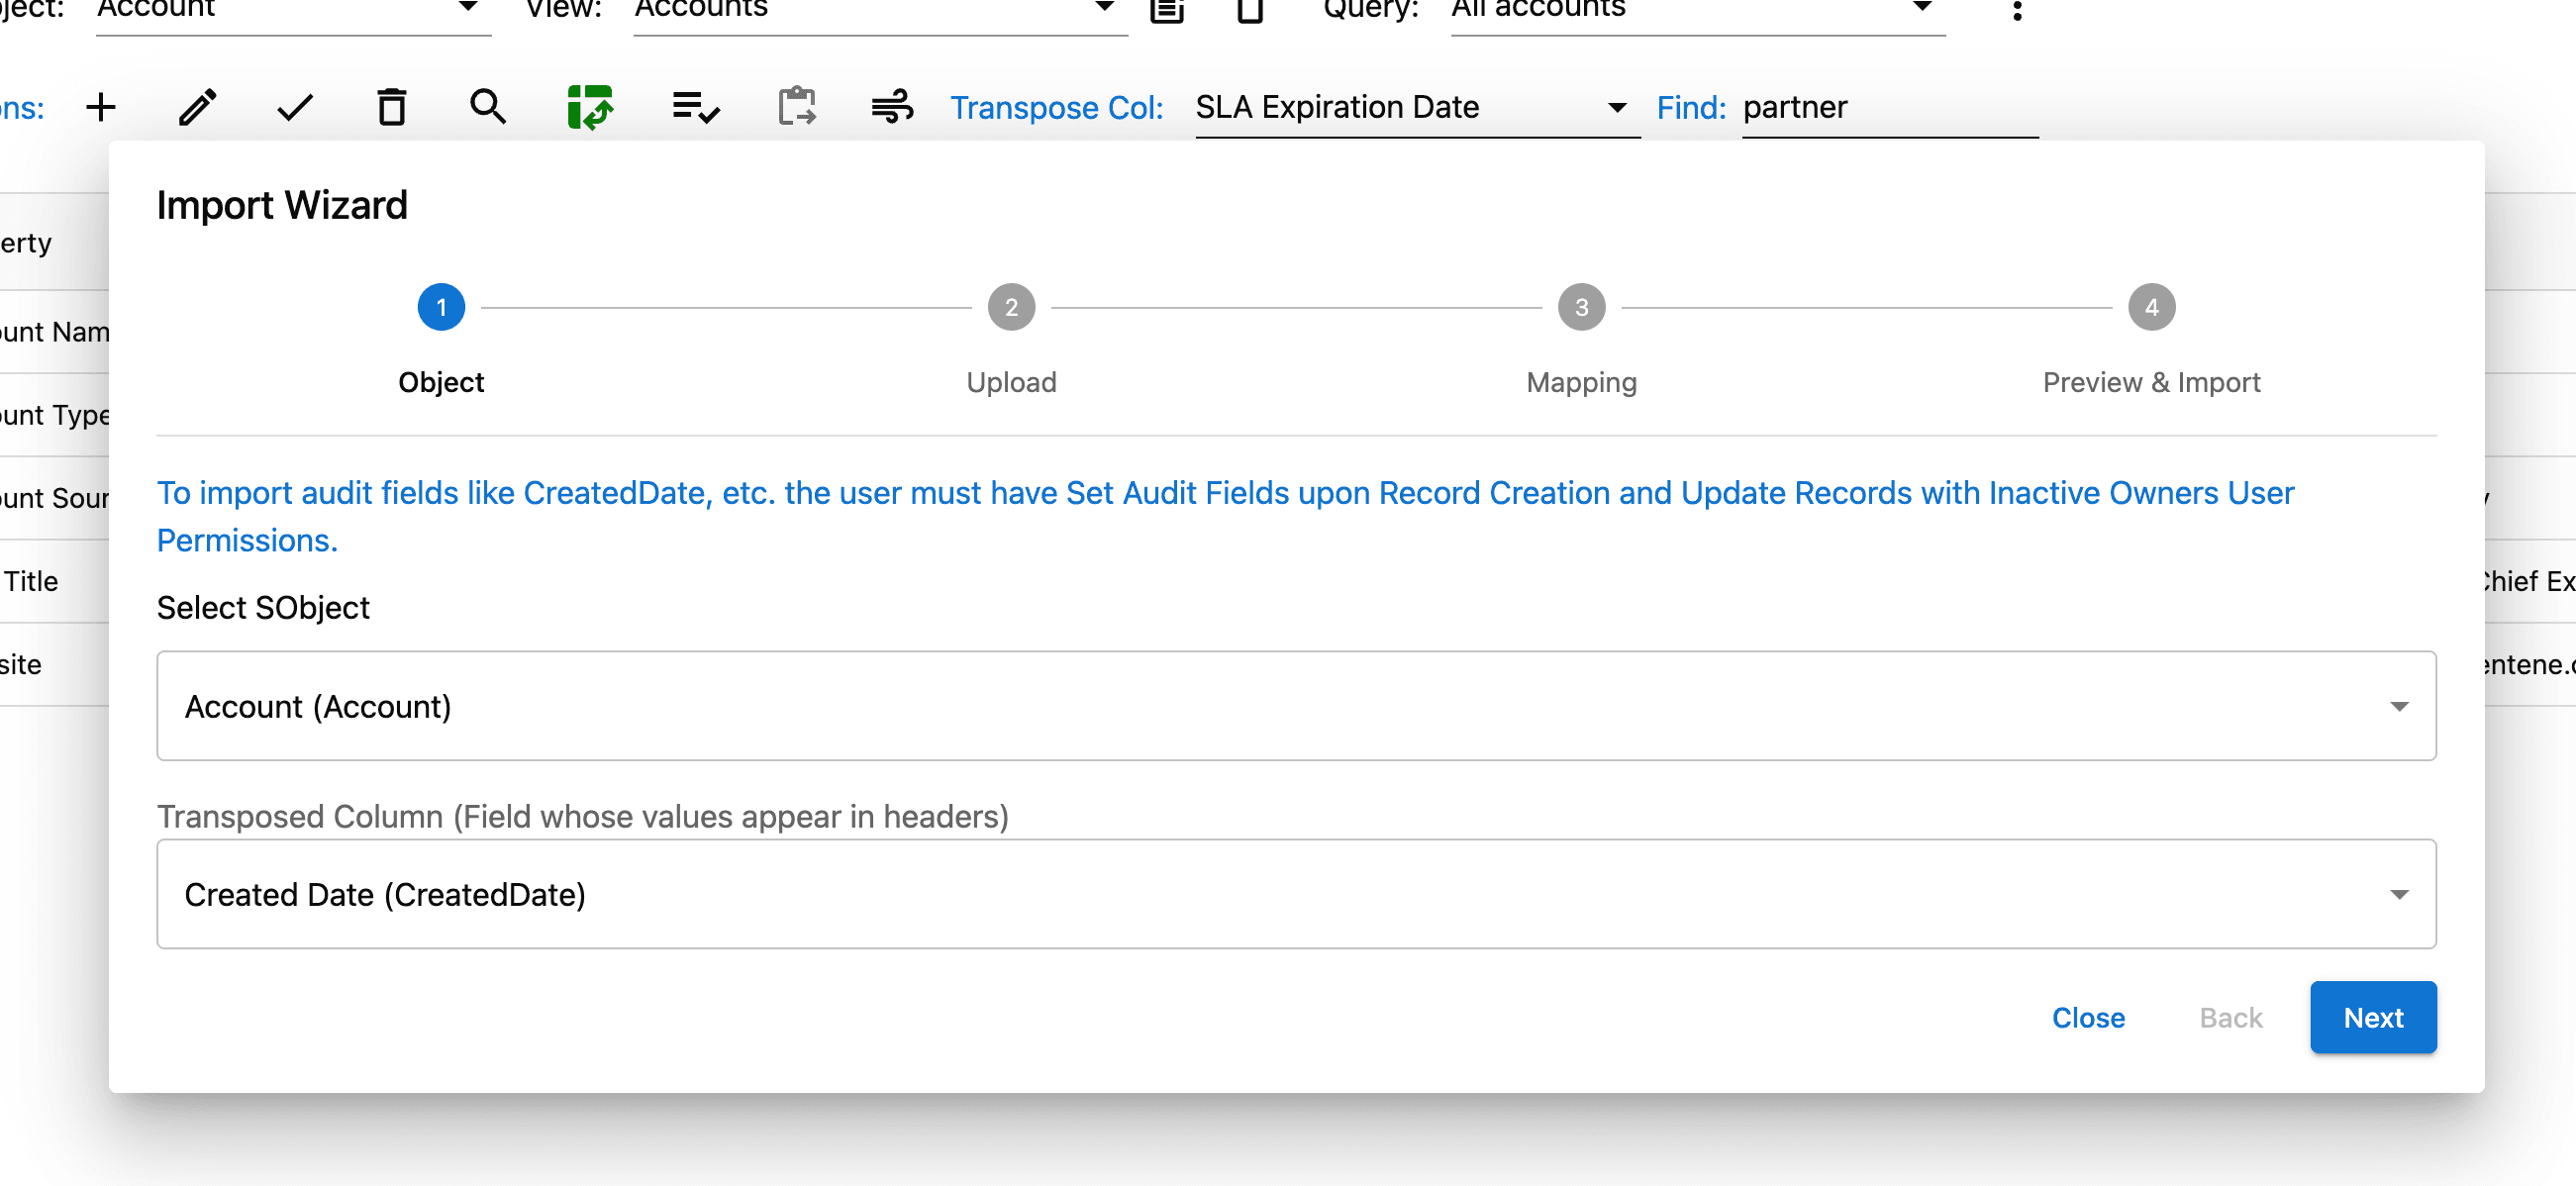
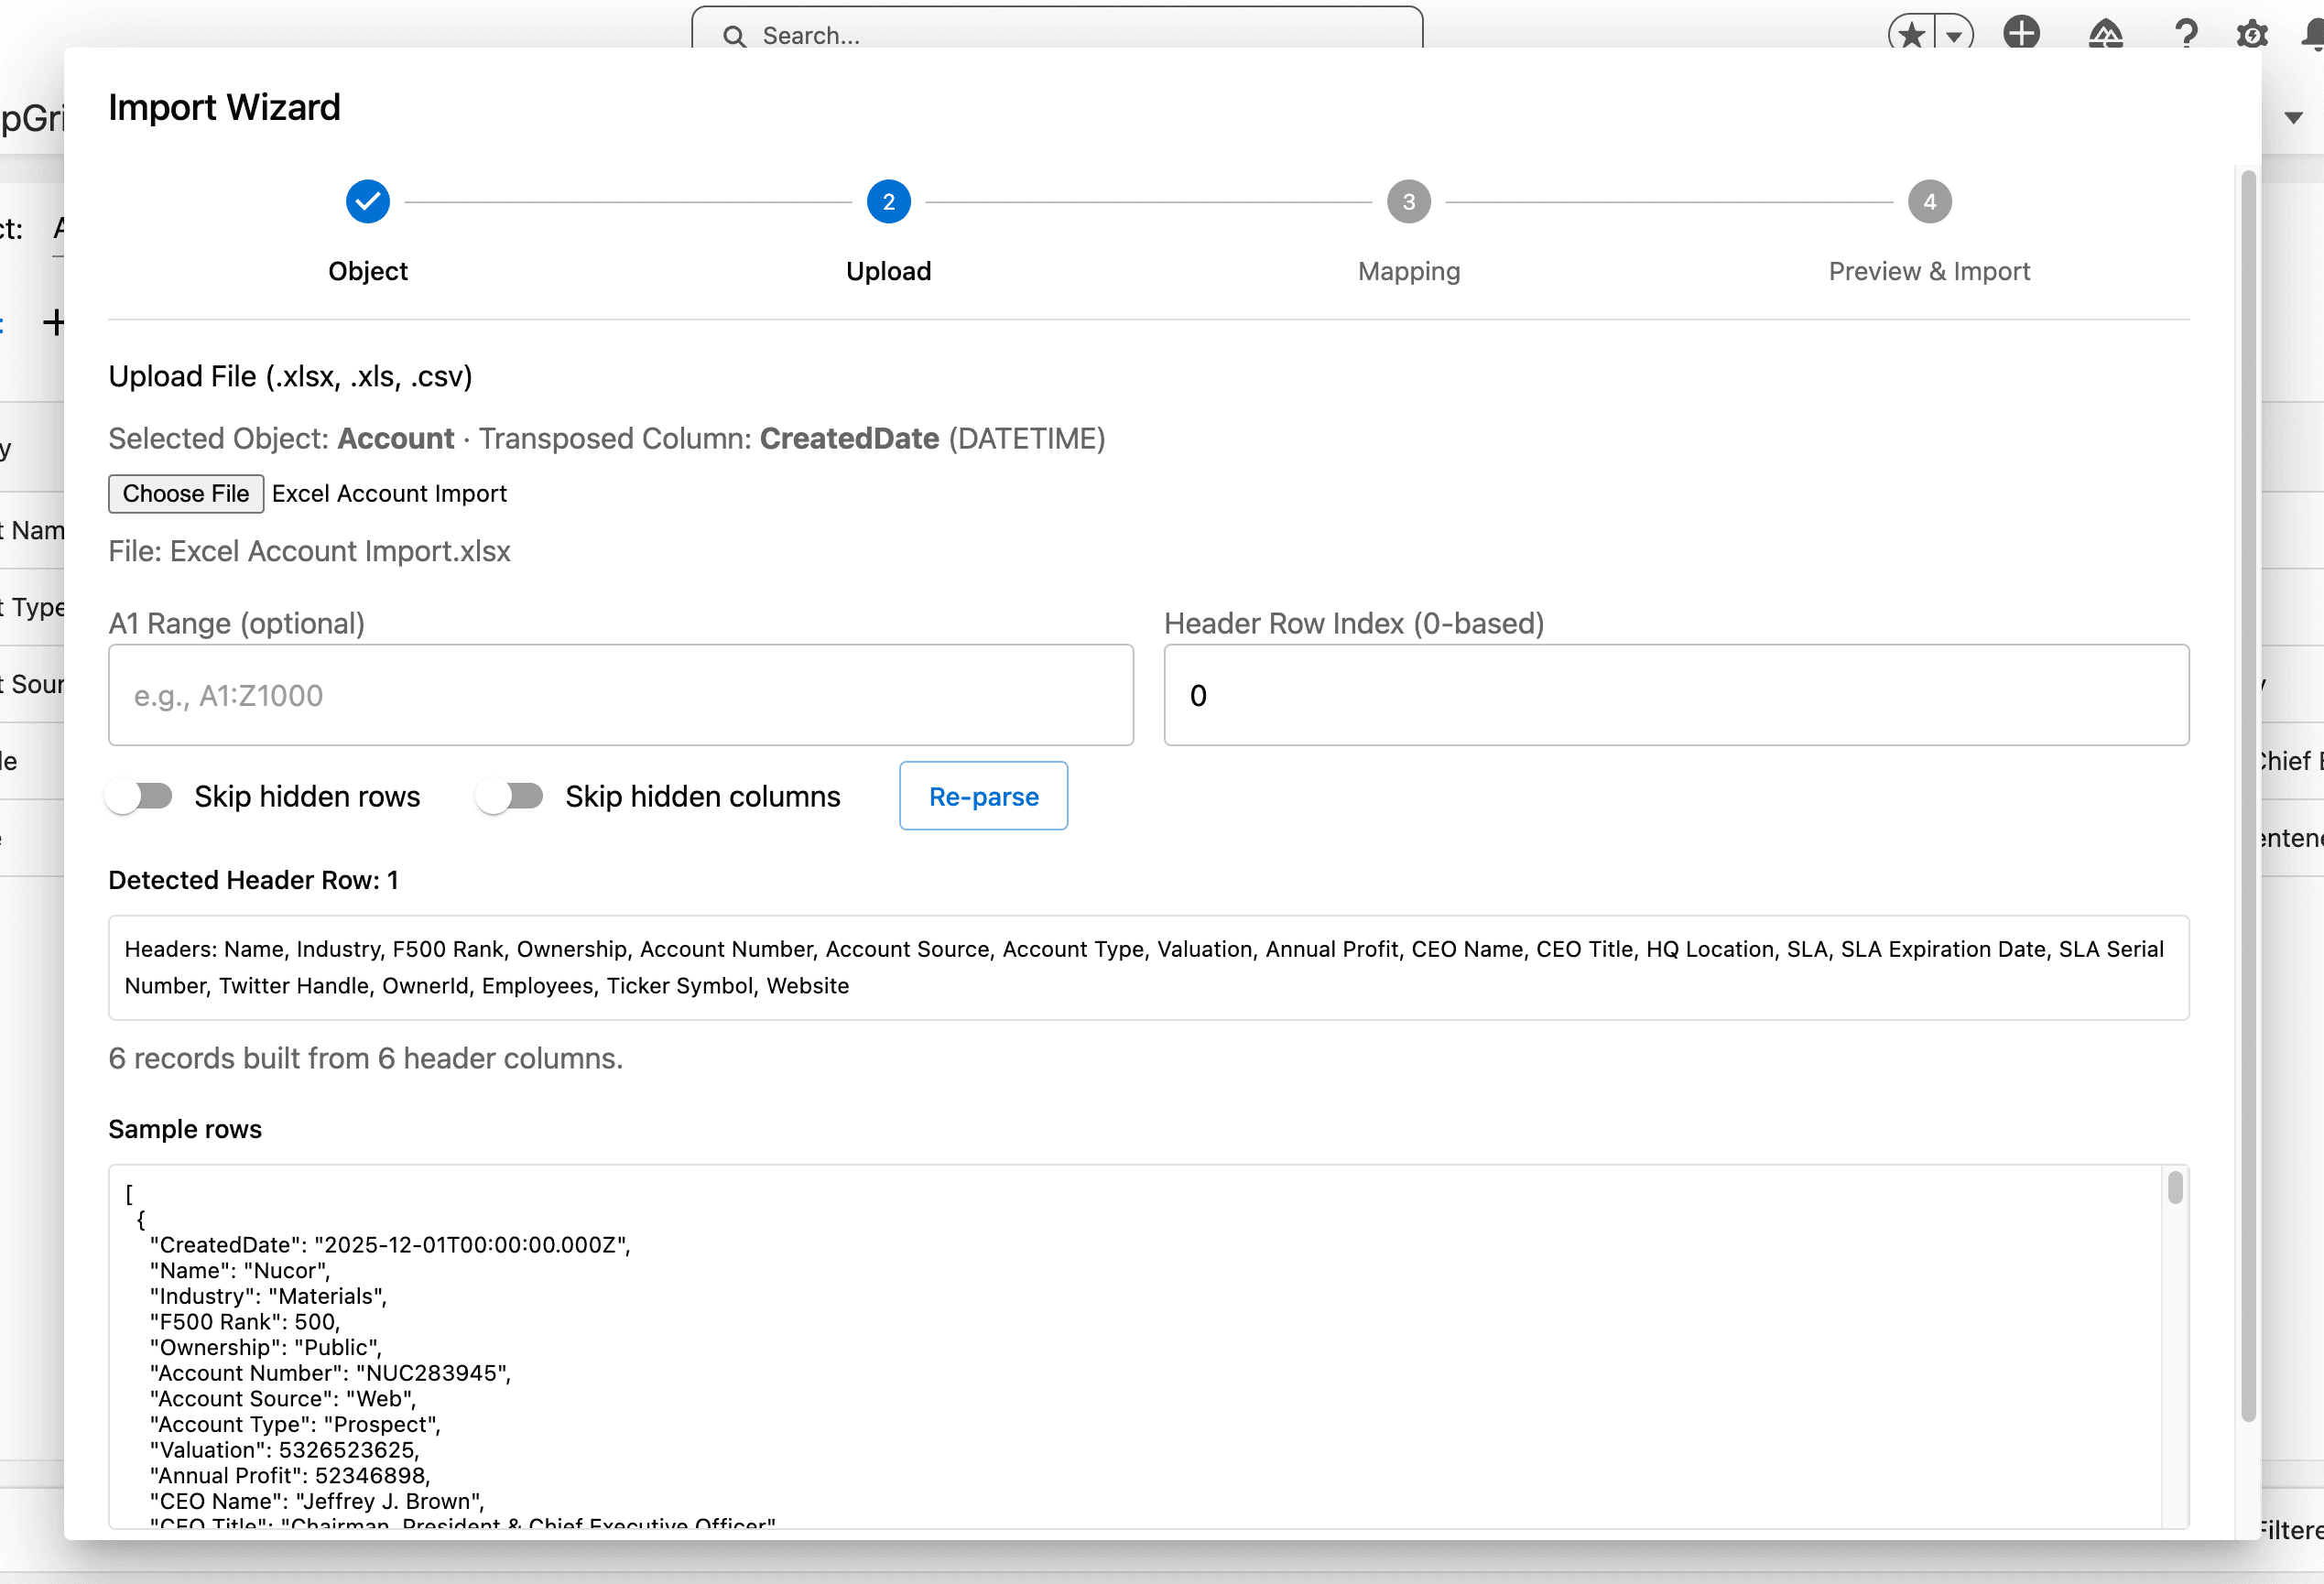
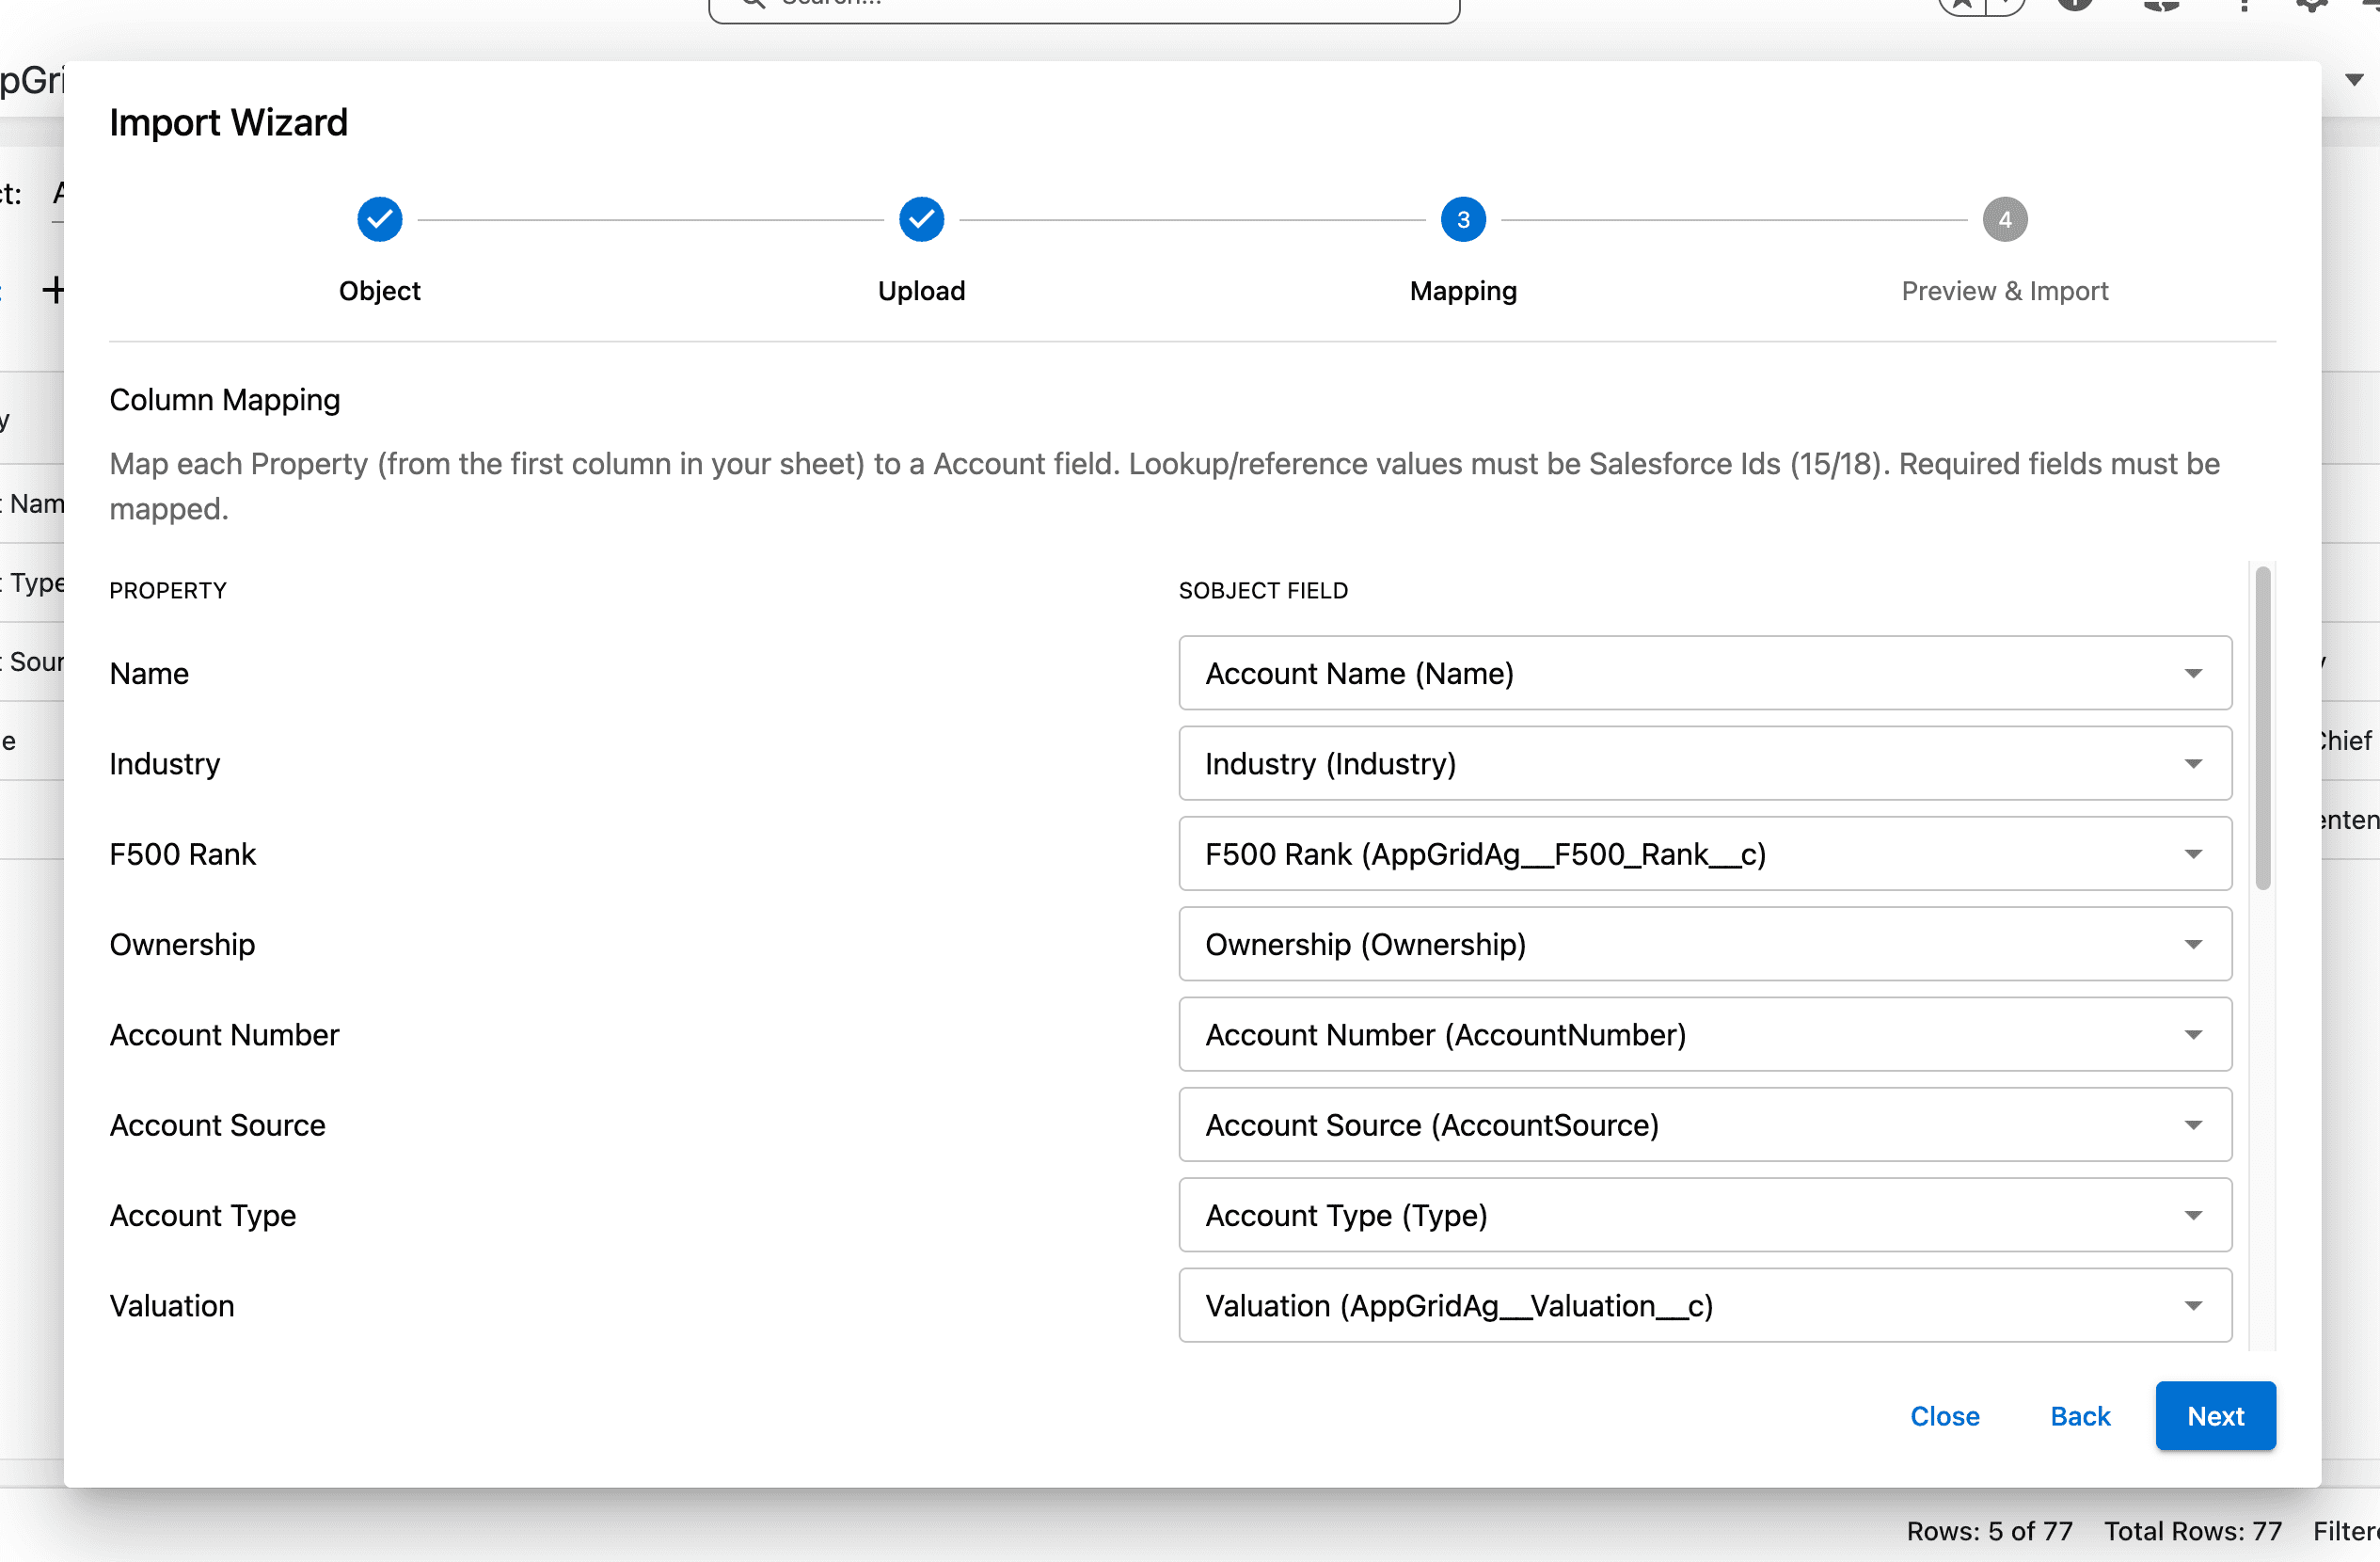
The AppGrid time series view makes creating time-series data like budgets or forecasts easy, fast and intuitive. Users typically create this type of data in Excel where the records are displayed in columns and the attributes displayed in rows, and that is also how the AppGrid time series view works. One reason for this is that it is very useful to see how specific values change as a function of time. The other challenge is related to record creation.
With a list view, it is very unintuitive to create records one by one, as you have no context as to how that record relates to other records. And lastly, what we really want to do is create the entire budget or forecast in a single transaction just like what we would do in Excel. The good news is that the AppGrid time series view provides these capabilities.


Creating the Lightning Page
AppGrid is a Lightning Web Component. It can be placed into a Lightning page by itself, or in combination with other Lightning Web Components. AppGrid is responsive and the layout will adjust to the available space provided to it by the Lightning page. We recommend that the minimum size of the page component should be no less than 800px. Before deploying AppGrid, we recommend that you implement the AppGrid deployment best practices defined here:
Setting object preferences
For the best user experience, we recommend that each user define what objects (and relationships) they wish to see in the grid toolbar object selector. To open the object preferences wizard, click the ellipse button in the toolbar and select Objects from the dropdown menu. Check the objects you will use frequently in your workflows and uncheck the rest. The object selector will now allow you to navigate between your preferred objects.
Setting relation preferences
Relation preferences are used to define what subgrids are displayed when you expand a grid row. The relation preferences wizard is context sensitive to the current selected object. For example, if we currently viewing Accounts then the relation preferences wizard will allow us to define those preferences. To open the relation preferences wizard, click the ellipse button in the toolbar and select Objects from the dropdown menu. Click the Relationships tab. Check the relationships you will use frequently in your workflows and uncheck the rest.
Selecting objects
Click the grid toolbar object selector and choose an object you wish to work with. AppGrid will load the views, queries, row & column format preferences, calculated columns and object flows that have been previously defined for that object. AppGrid will auto-select the last view and query used and the grid will display the selected view and query data.
Selecting views
For each object, AppGrid allows you to create multiple views of various types, including a list view, grouped view or pivot view. If no views have been previously defined when you select a given object, AppGrid will create a default view automatically. To change the current view, select the desired view from the view selector. To create a new view, click the column manager button in the grid toolbar. The column manager wizard will open.
Selecting queries
For each object, AppGrid allows you to create multiple queries. If no queries have been previously defined when you select a given object, AppGrid will display a notification with a quick link to open the query wizard. When you select an object, AppGrid will load the previously defined queries into the query selector. To change the current query, select the desired query from the query selector. To create a new query, click the query wizard button in the grid toolbar. The query wizard will open.
Using column filters
Beside each column, AppGrid displays a filter icon. Clicking the icon will open a filter dialog that allows you to create a filter expression that will filter the displayed data. If more than 1 column filter is created, AppGrid will apply all active filters. Click the Clear Filters button in the grid toolbar to clear all filters. When a filter is active, the Clear Filters button will be displayed in green to indicate that filters have been applied to the displayed data.
Using advanced multi-column filters
AppGrid provides the ability to create multi-column filter expressions that are more powerful than what can be achieved with regular column filters. To open the advanced filter wizard, click the Enable Advanced Filter button in the grid toolbar. The advanced filter will be displayed below the column headers. There are 2 ways to create the filter expressions 1) click into the filter box and 2) click the Builder button. The Builder provides a graphical UI that makes it very easy to create filter expressions.
Creating views
AppGrid provides the ability to create multiple views for a given object. If we are viewing Account records, we may want to configure a list view, a grouped view and/or a pivot view. Depending on our workflow, this allows us to present information in the most optimal way to accomplish our task. To create a view, click on the Open Columns Panel toolbar button. Watch this video to learn how to create views.
Creating queries
AppGrid provides the ability to create multi-column filter expressions that are more powerful than what can be achieved with regular column filters. To open the advanced filter wizard, click the Enable Advanced Filter button in the grid toolbar. The advanced filter will be displayed below the column headers. There are 2 ways to create the filter expressions 1) click into the filter box and 2) click the Builder button. The Builder provides a graphical UI that makes it very easy to create filter expressions.
Creating row & column styles
AppGrid provides the ability to create multi-column filter expressions that are more powerful than what can be achieved with regular column filters. To open the advanced filter wizard, click the Enable Advanced Filter button in the grid toolbar. The advanced filter will be displayed below the column headers. There are 2 ways to create the filter expressions 1) click into the filter box and 2) click the Builder button. The Builder provides a graphical UI that makes it very easy to create filter expressions.
Creating calculated columns
AppGrid provides the ability to create multi-column filter expressions that are more powerful than what can be achieved with regular column filters. To open the advanced filter wizard, click the Enable Advanced Filter button in the grid toolbar. The advanced filter will be displayed below the column headers. There are 2 ways to create the filter expressions 1) click into the filter box and 2) click the Builder button. The Builder provides a graphical UI that makes it very easy to create filter expressions.
Creating flows
AppGrid provides the ability to create multi-column filter expressions that are more powerful than what can be achieved with regular column filters. To open the advanced filter wizard, click the Enable Advanced Filter button in the grid toolbar. The advanced filter will be displayed below the column headers. There are 2 ways to create the filter expressions 1) click into the filter box and 2) click the Builder button. The Builder provides a graphical UI that makes it very easy to create filter expressions.
Configuring permissions
AppGrid provides the ability to create multi-column filter expressions that are more powerful than what can be achieved with regular column filters. To open the advanced filter wizard, click the Enable Advanced Filter button in the grid toolbar. The advanced filter will be displayed below the column headers. There are 2 ways to create the filter expressions 1) click into the filter box and 2) click the Builder button. The Builder provides a graphical UI that makes it very easy to create filter expressions.
Selecting rows
AppGrid provides the ability to create multi-column filter expressions that are more powerful than what can be achieved with regular column filters. To open the advanced filter wizard, click the Enable Advanced Filter button in the grid toolbar. The advanced filter will be displayed below the column headers. There are 2 ways to create the filter expressions 1) click into the filter box and 2) click the Builder button. The Builder provides a graphical UI that makes it very easy to create filter expressions.
Selecting grid views
AppGrid provides the ability to create multi-column filter expressions that are more powerful than what can be achieved with regular column filters. To open the advanced filter wizard, click the Enable Advanced Filter button in the grid toolbar. The advanced filter will be displayed below the column headers. There are 2 ways to create the filter expressions 1) click into the filter box and 2) click the Builder button. The Builder provides a graphical UI that makes it very easy to create filter expressions.
Adding grid records
AppGrid provides the ability to create multi-column filter expressions that are more powerful than what can be achieved with regular column filters. To open the advanced filter wizard, click the Enable Advanced Filter button in the grid toolbar. The advanced filter will be displayed below the column headers. There are 2 ways to create the filter expressions 1) click into the filter box and 2) click the Builder button. The Builder provides a graphical UI that makes it very easy to create filter expressions.
Editing grid records
AppGrid provides the ability to create multi-column filter expressions that are more powerful than what can be achieved with regular column filters. To open the advanced filter wizard, click the Enable Advanced Filter button in the grid toolbar. The advanced filter will be displayed below the column headers. There are 2 ways to create the filter expressions 1) click into the filter box and 2) click the Builder button. The Builder provides a graphical UI that makes it very easy to create filter expressions.
Deleting grid records
AppGrid provides the ability to create multi-column filter expressions that are more powerful than what can be achieved with regular column filters. To open the advanced filter wizard, click the Enable Advanced Filter button in the grid toolbar. The advanced filter will be displayed below the column headers. There are 2 ways to create the filter expressions 1) click into the filter box and 2) click the Builder button. The Builder provides a graphical UI that makes it very easy to create filter expressions.
Inline editing
AppGrid provides the ability to create multi-column filter expressions that are more powerful than what can be achieved with regular column filters. To open the advanced filter wizard, click the Enable Advanced Filter button in the grid toolbar. The advanced filter will be displayed below the column headers. There are 2 ways to create the filter expressions 1) click into the filter box and 2) click the Builder button. The Builder provides a graphical UI that makes it very easy to create filter expressions.
Viewing related data
AppGrid provides the ability to create multi-column filter expressions that are more powerful than what can be achieved with regular column filters. To open the advanced filter wizard, click the Enable Advanced Filter button in the grid toolbar. The advanced filter will be displayed below the column headers. There are 2 ways to create the filter expressions 1) click into the filter box and 2) click the Builder button. The Builder provides a graphical UI that makes it very easy to create filter expressions.
Creating & using charts
AppGrid provides the ability to create multi-column filter expressions that are more powerful than what can be achieved with regular column filters. To open the advanced filter wizard, click the Enable Advanced Filter button in the grid toolbar. The advanced filter will be displayed below the column headers. There are 2 ways to create the filter expressions 1) click into the filter box and 2) click the Builder button. The Builder provides a graphical UI that makes it very easy to create filter expressions.
Deployment best practices
AppGrid provides the ability to create multi-column filter expressions that are more powerful than what can be achieved with regular column filters. To open the advanced filter wizard, click the Enable Advanced Filter button in the grid toolbar. The advanced filter will be displayed below the column headers. There are 2 ways to create the filter expressions 1) click into the filter box and 2) click the Builder button. The Builder provides a graphical UI that makes it very easy to create filter expressions.
Sorting
To sort the grid records, click on a column header. The grid records will be sorted in ascending order. The column header will display an arrow icon indicating the direction of sort. To sort in descending order, click the column header again. A third click on the column header will remove the sort. To sort on multiple columns, hold the shift key and click another column header. You will see a number beside the column icon which indicates the sort priority.
Quick info
AppGrid provides a handy way to perform a quick calculation of column values. Click and drag across any numerical column records. In the footer you will see the sum, min, max, average and count of the selected rows.